文章目录
- 前言
- 一、设计一个简单机械臂
- 二、构造
- 创建文件关系
- CMakeLists.txt 修改增加如下:
- package.xml 修改增加如下:
- urdf.rviz 全文如下:
- demo.launch.py 全文如下:
- launch rviz
- 构造link
- 构造joint
- 总结
前言
在网上搜了许多文章,过了一遍moveit2 humble的说明文档,没找到如何搭建一个新的机械臂模型,在moveit 中有提供setup_assistant_tutorial1通过这个助手来实现编辑机器人相关参数,但是从空文件开始搭建一个机械臂相关参数的架构并没有相关教程,所有想直接从零开始写一个机械手相关的参数的体系,也有助于理解其中的参数。
本文主要写如何搭建一个urdf2文件,并且配置好其中的底座、轴关节、轴末端工具安装位置。
关于srdf3后续补充,这里有两个引用是官方的文件说明值得一看。
一、设计一个简单机械臂
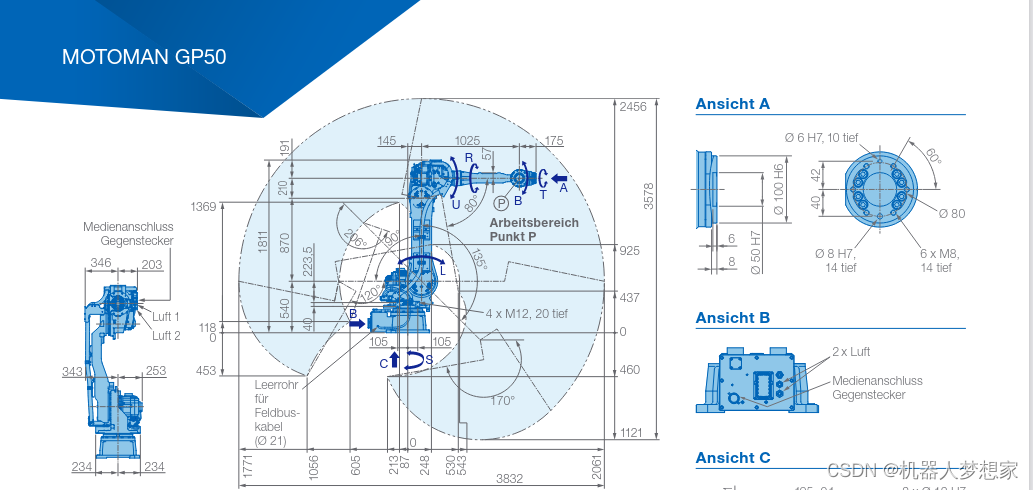
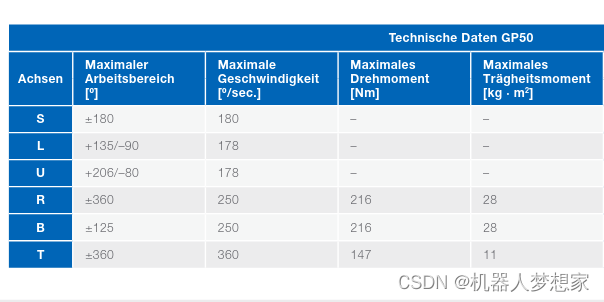
博主在这里按照yaskawa GP50型号机械臂传动结构定义如下模型,底座用box代表,轴用cylinder代表。
具体尺寸如下所示:
| L(m) | W/R(m) | H(m) | |
|---|---|---|---|
| 底座 | 0.5 | 0.5 | 0.4 |
| S轴 | 0.1 | 0.4 | |
| L轴 | 0.1 | 0.4 | |
| U轴 | 0.1 | 0.4 | |
| R轴 | 0.1 | 0.2 | |
| B轴 | 0.1 | 0.2 | |
| T轴 | 0.1 | 0.2 |
二、构造
创建文件关系
按照文件名及关系创建如下文件夹,之所以创建这一套是为了方便通过launch rviz验证所构造的机械臂模型是否正确。
.
└── 6axis_moveit_config	# 项目文件夹
    ├── config	# 保存配置文件
    │   └── urdf.rviz
    ├── launch # 保存launch文件
    │   └── demo.launch.py
    ├── urdf # 保存urdf文件
    │   └── 6_axis.urdf
    ├── CMakeLists.txt
    └── package.xml
CMakeLists.txt 修改增加如下:
project(moveit_resources_6axis_moveit_config)
...
install(DIRECTORY config launch urdf DESTINATION share/${PROJECT_NAME})
package.xml 修改增加如下:
	...
  <exec_depend>joint_state_publisher</exec_depend>
  <exec_depend>joint_state_publisher_gui</exec_depend>
  <exec_depend>robot_state_publisher</exec_depend>
  <exec_depend>rviz2</exec_depend>
  <exec_depend>xacro</exec_depend>
	...
urdf.rviz 全文如下:
Panels:
  - Class: rviz_common/Displays
    Name: Displays
  - Class: rviz_common/Views
    Name: Views
Visualization Manager:
  Class: ""
  Displays:
    - Class: rviz_default_plugins/Grid
      Name: Grid
      Value: true
    - Alpha: 0.8
      Class: rviz_default_plugins/RobotModel
      Description Source: Topic
      Description Topic:
        Value: /robot_description
      Enabled: true
      Name: RobotModel
      Value: true
    - Class: rviz_default_plugins/TF
      Name: TF
      Value: true
  Global Options:
    Fixed Frame: base_link
    Frame Rate: 30
  Name: root
  Tools:
    - Class: rviz_default_plugins/MoveCamera
  Value: true
  Views:
    Current:
      Class: rviz_default_plugins/Orbit
      Distance: 1.7
      Name: Current View
      Pitch: 0.33
      Value: Orbit (rviz)
      Yaw: 5.5
Window Geometry:
  Height: 800
  Width: 1200
demo.launch.py 全文如下:
import os
from ament_index_python.packages import get_package_share_directory

from launch import LaunchDescription
from launch.actions import DeclareLaunchArgument, ExecuteProcess
from launch.substitutions import LaunchConfiguration
from launch.conditions import IfCondition
from launch_ros.actions import Node
from launch.actions import ExecuteProcess
from moveit_configs_utils import MoveItConfigsBuilder

def generate_launch_description():
    # Get the launch directory
    bringup_dir = get_package_share_directory('moveit_resources_6axis_moveit_config')
    launch_dir = os.path.join(bringup_dir, 'launch')

    # Launch configuration variables specific to simulation
    rviz_config_file = LaunchConfiguration('rviz_config_file')
    use_robot_state_pub = LaunchConfiguration('use_robot_state_pub')
    use_joint_state_pub = LaunchConfiguration('use_joint_state_pub')
    use_rviz = LaunchConfiguration('use_rviz')
    urdf_file= LaunchConfiguration('urdf_file')

    declare_rviz_config_file_cmd = DeclareLaunchArgument(
        'rviz_config_file',
        default_value=os.path.join(bringup_dir, 'config', 'urdf.rviz'),
        description='Full path to the RVIZ config file to use')
    declare_use_robot_state_pub_cmd = DeclareLaunchArgument(
        'use_robot_state_pub',
        default_value='True',
        description='Whether to start the robot state publisher')
    declare_use_joint_state_pub_cmd = DeclareLaunchArgument(
        'use_joint_state_pub',
        default_value='True',
        description='Whether to start the joint state publisher')
    declare_use_rviz_cmd = DeclareLaunchArgument(
        'use_rviz',
        default_value='True',
        description='Whether to start RVIZ')

    declare_urdf_cmd = DeclareLaunchArgument(
        'urdf_file',
        default_value=os.path.join(bringup_dir, 'urdf', '6_axis.urdf'),
        description='Whether to start RVIZ')

    start_robot_state_publisher_cmd = Node(
        condition=IfCondition(use_robot_state_pub),
        package='robot_state_publisher',
        executable='robot_state_publisher',
        name='robot_state_publisher',
        output='screen',
        arguments=[urdf_file])

    start_joint_state_publisher_cmd = Node(
        condition=IfCondition(use_joint_state_pub),
        package='joint_state_publisher_gui',
        executable='joint_state_publisher_gui',
        name='joint_state_publisher_gui',
        output='screen',
        arguments=[urdf_file])

    rviz_cmd = Node(
        condition=IfCondition(use_rviz),
        package='rviz2',
        executable='rviz2',
        name='rviz2',
        arguments=['-d', rviz_config_file],
        output='screen')

    return LaunchDescription(
        [
            declare_rviz_config_file_cmd,
            declare_use_robot_state_pub_cmd,
            declare_use_joint_state_pub_cmd,
            declare_use_rviz_cmd,
            declare_urdf_cmd,
            start_robot_state_publisher_cmd,
            start_joint_state_publisher_cmd,
            rviz_cmd
        ]
    )
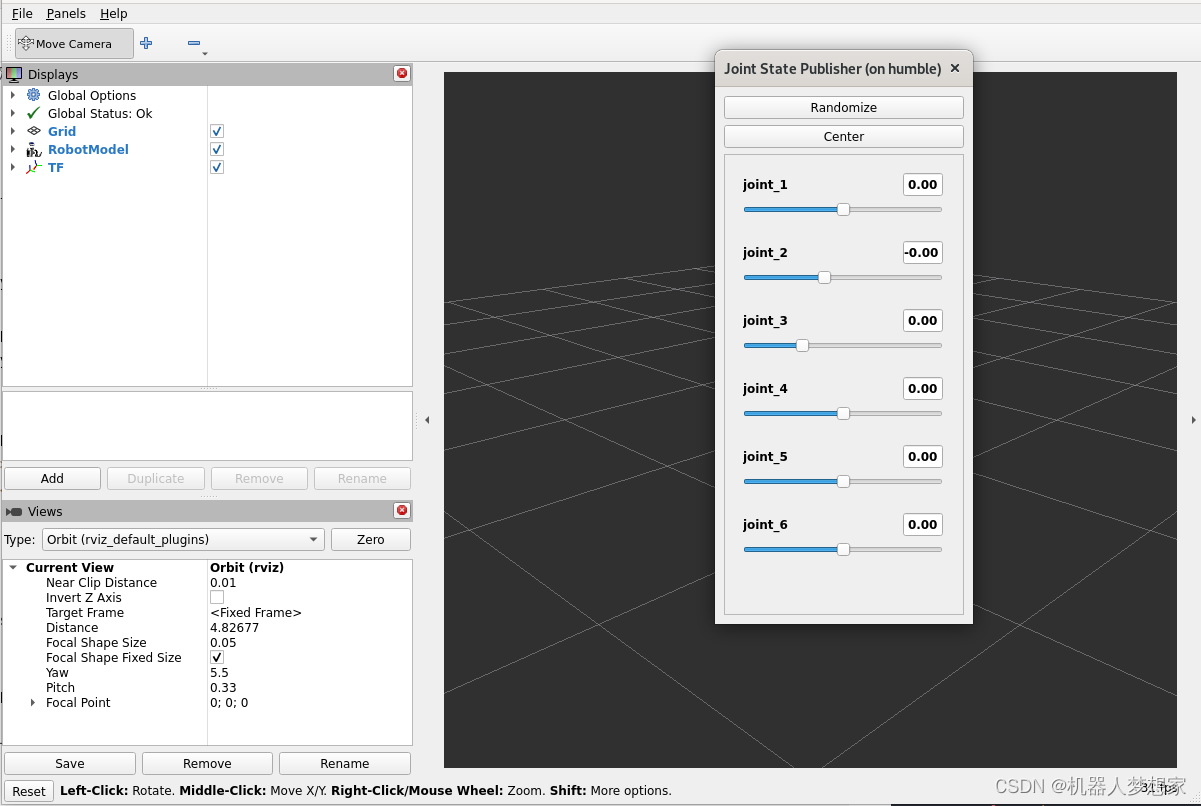
launch rviz
在上边已经定义好了文件结构,那我们就在此基础上开始编译程序,并调用ros2 launch启动程序。
# 编译包
colcon build --packages-up-to moveit_resources_6axis_moveit_config --cmake-args -DCMAKE_BUILD_TYPE=Release

# output:
/usr/lib/python3/dist-packages/colcon_core/argument_parser/type_collector.py:9: UserWarning: 'colcon_core.argument_parser.type_collector.TypeCollectorDecorator' has been deprecated
  class TypeCollectorDecorator(ArgumentParserDecorator):
/usr/lib/python3/dist-packages/colcon_core/argument_parser/type_collector.py:62: UserWarning: 'colcon_core.argument_parser.type_collector.SuppressTypeConversions' has been deprecated, use 'colcon_core.argument_parser.action_collector.SuppressTypeConversions' instead
  class SuppressTypeConversions:
Starting >>> moveit_resources_6axis_moveit_config
Finished <<< moveit_resources_6axis_moveit_config [0.57s]

Summary: 1 package finished [0.64s]

# 安装包
. install/setup.bash

# 启动包
ros2 launch moveit_resources_6axis_moveit_config demo.launch.py
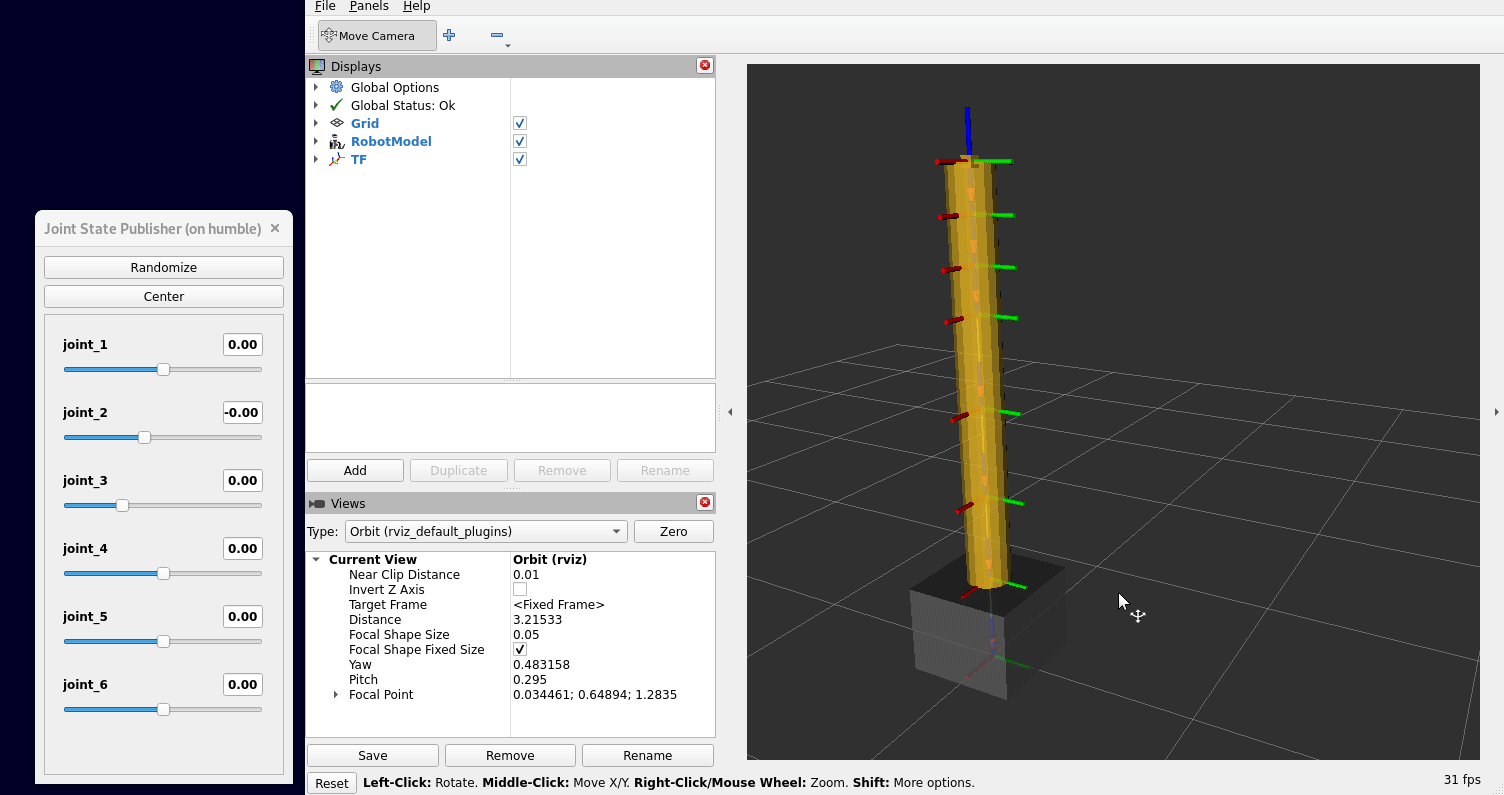
弹出界面如下所示:
构造link
  <link name="base_link">
    <visual>
      <origin rpy="0 0 0" xyz="0 0 0.2"/>
      <geometry>
        <box size="0.5 0.5 0.4"/>
      </geometry>
      <material name="">
        <color rgba="0.4 0.4 0.4 1.0"/>
      </material>
    </visual>
    <collision>
      <origin rpy="0 0 0" xyz="0 0 0.2"/>
      <geometry>
        <box size="0.5 0.5 0.4"/>
      </geometry>
    </collision>
  </link>
  <link name="link_1">
    <visual>
      <origin rpy="0 0 0" xyz="0 0 0.2"/>
      <geometry>
        <cylinder length="0.4" radius="0.1"/>
      </geometry>
      <material name="">
        <color rgba="0.96 0.76 0.13 1.0"/>
      </material>
    </visual>
    <collision>
      <origin rpy="0 0 0" xyz="0 0 0.2"/>
      <geometry>
        <cylinder length="0.4" radius="0.1"/>
      </geometry>
    </collision>
  </link>
  <link name="link_2">
    <visual>
      <origin rpy="0 0 0" xyz="0 0 0.2"/>
      <geometry>
        <cylinder length="0.4" radius="0.1"/>
      </geometry>
      <material name="">
        <color rgba="0.96 0.76 0.13 1.0"/>
      </material>
    </visual>
    <collision>
      <origin rpy="0 0 0" xyz="0 0 0.2"/>
      <geometry>
        <cylinder length="0.4" radius="0.1"/>
      </geometry>
    </collision>
  </link>
  <link name="link_3">
    <visual>
      <origin rpy="0 0 0" xyz="0 0 0.2"/>
      <geometry>
        <cylinder length="0.4" radius="0.1"/>
      </geometry>
      <material name="">
        <color rgba="0.96 0.76 0.13 1.0"/>
      </material>
    </visual>
    <collision>
      <origin rpy="0 0 0" xyz="0 0 0.2"/>
      <geometry>
        <cylinder length="0.4" radius="0.1"/>
      </geometry>
    </collision>
  </link>
  <link name="link_4">
    <visual>
      <origin rpy="0 0 0" xyz="0 0 0.1"/>
      <geometry>
        <cylinder length="0.2" radius="0.1"/>
      </geometry>
      <material name="">
        <color rgba="0.96 0.76 0.13 1.0"/>
      </material>
    </visual>
    <collision>
      <origin rpy="0 0 0" xyz="0 0 0.1"/>
      <geometry>
        <cylinder length="0.2" radius="0.1"/>
      </geometry>
    </collision>
  </link>
  <link name="link_5">
    <visual>
      <origin rpy="0 0 0" xyz="0 0 0.1"/>
      <geometry>
        <cylinder length="0.2" radius="0.1"/>
      </geometry>
      <material name="">
        <color rgba="0.96 0.76 0.13 1.0"/>
      </material>
    </visual>
    <collision>
      <origin rpy="0 0 0" xyz="0 0 0.1"/>
      <geometry>
        <cylinder length="0.2" radius="0.1"/>
      </geometry>
    </collision>
  </link>
  <link name="link_6">
    <visual>
      <origin rpy="0 0 0" xyz="0 0 0.1"/>
      <geometry>
        <cylinder length="0.2" radius="0.1"/>
      </geometry>
      <material name="">
        <color rgba="0.96 0.76 0.13 1.0"/>
      </material>
    </visual>
    <collision>
      <origin rpy="0 0 0" xyz="0 0 0.1"/>
      <geometry>
        <cylinder length="0.2" radius="0.1"/>
      </geometry>
    </collision>
  </link>
  <link name="tool0">
    <visual>
      <origin rpy="0 0 0" xyz="0 0 0"/>
      <geometry>
        <box size="0.05 0.05 0.05"/>
      </geometry>
      <material name="">
        <color rgba="0.96 0.76 0.13 1.0"/>
      </material>
    </visual>
  </link>
  <link name="base"/>
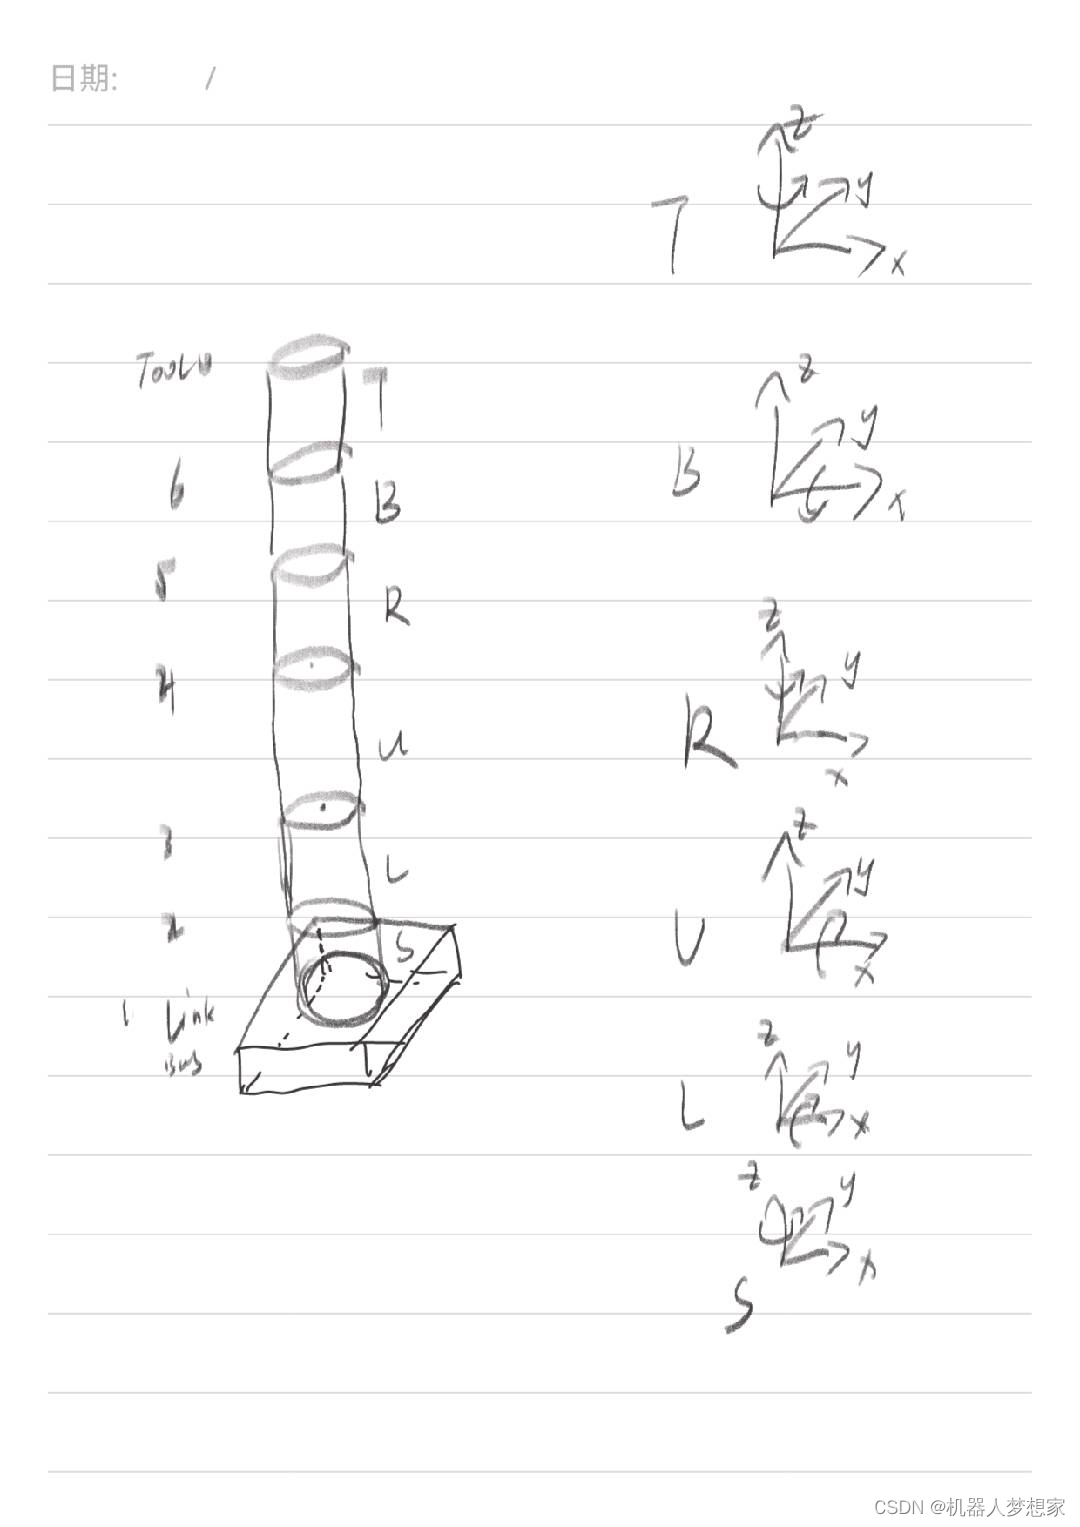
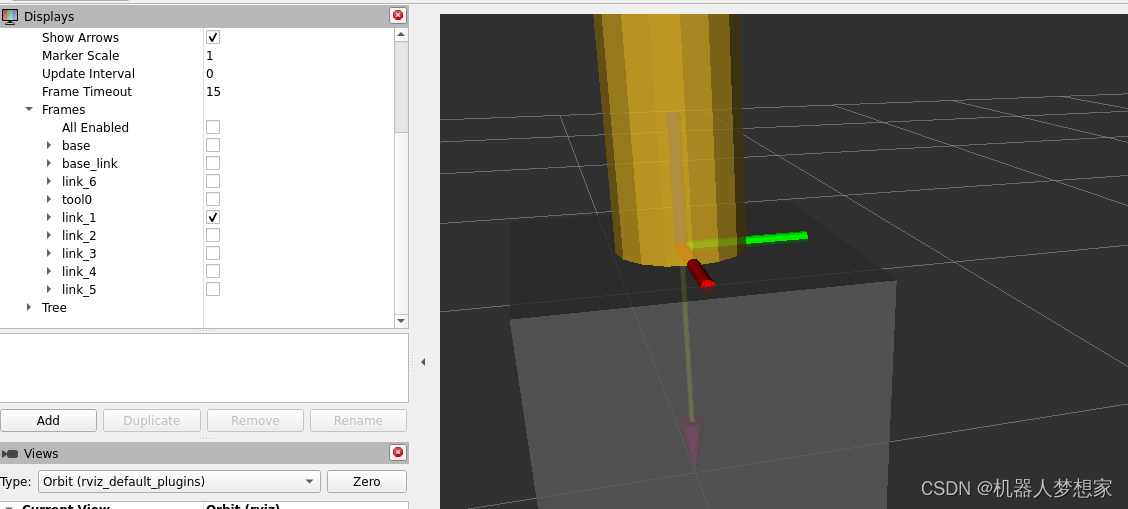
base_link 我们的意图是将坐标系放置在box的下底面如图所示:

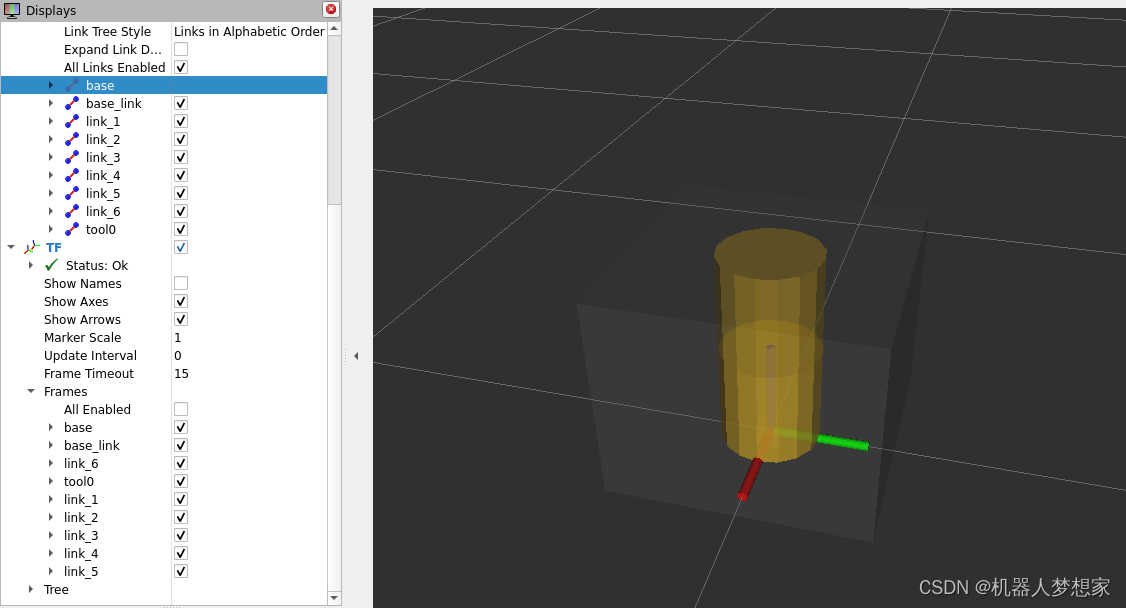
link_1 我们的意图是将坐标系放在圆柱的下底面如图所示:
其余各轴均是按照该原则,最终结果如下所示:
接下来使用joint设置各轴之间的相对位置。
构造joint
其中:
- origin 控制该轴相对parent link的相对位置、
如<origin rpy="0 0 0" xyz="0 0 0.4"/>与parent link相比向z正方向移动0.4m
rpy可以查欧拉角的意义。欧拉角_百度百科
- axis 控制该轴运动方向,旋转时符合右手定则
如<axis xyz="0 0 1"/>约束为绕z轴正方向旋转
如<axis xyz="0 1 0"/>约束为绕y轴正方向旋转
如<axis xyz="-1 0 0"/>约束为绕x轴负方向旋转
  <joint name="joint_1" type="revolute">
    <origin rpy="0 0 0" xyz="0 0 0.4"/>
    <parent link="base_link"/>
    <child link="link_1"/>
    <axis xyz="0 0 1"/>
    <limit effort="0" lower="-3.14" upper="3.14" velocity="3.67"/>
  </joint>
  <joint name="joint_2" type="revolute">
    <origin rpy="0 0 0" xyz="0 0 0.4"/>
    <parent link="link_1"/>
    <child link="link_2"/>
    <axis xyz="0 1 0"/>
    <limit effort="0" lower="-1.57" upper="2.36" velocity="3.32"/>
  </joint>
  <joint name="joint_3" type="revolute">
    <origin rpy="0 0 0" xyz="0 0 0.4"/>
    <parent link="link_2"/>
    <child link="link_3"/>
    <axis xyz="0 -1 0"/>
    <limit effort="0" lower="-1.4" upper="3.6" velocity="3.67"/>
  </joint>
  <joint name="joint_4" type="revolute">
    <origin rpy="0 0 0" xyz="0 0 0.4"/>
    <parent link="link_3"/>
    <child link="link_4"/>
    <axis xyz="0 0 1"/>
    <limit effort="0" lower="-6.28" upper="6.28" velocity="6.98"/>
  </joint>
  <joint name="joint_5" type="revolute">
    <origin rpy="0 0 0" xyz="0 0 0.2"/>
    <parent link="link_4"/>
    <child link="link_5"/>
    <axis xyz="0 -1 0"/>
    <limit effort="0" lower="-2.18" upper="2.18" velocity="6.98"/>
  </joint>
  <joint name="joint_6" type="revolute">
    <origin rpy="0 0 0" xyz="0 0 0.2"/>
    <parent link="link_5"/>
    <child link="link_6"/>
    <axis xyz="0 0 1"/>
    <limit effort="0" lower="-6.28" upper="6.28" velocity="10.47"/>
  </joint>
  <joint name="joint_6-tool0" type="fixed">
    <origin rpy="0 0 0" xyz="0 0 0.2"/>
    <parent link="link_6"/>
    <child link="tool0"/>
  </joint>
  <joint name="base_link-base" type="fixed">
    <origin rpy="0 0 0" xyz="0 0 0.4"/>
    <parent link="base_link"/>
    <child link="base"/>
  </joint>
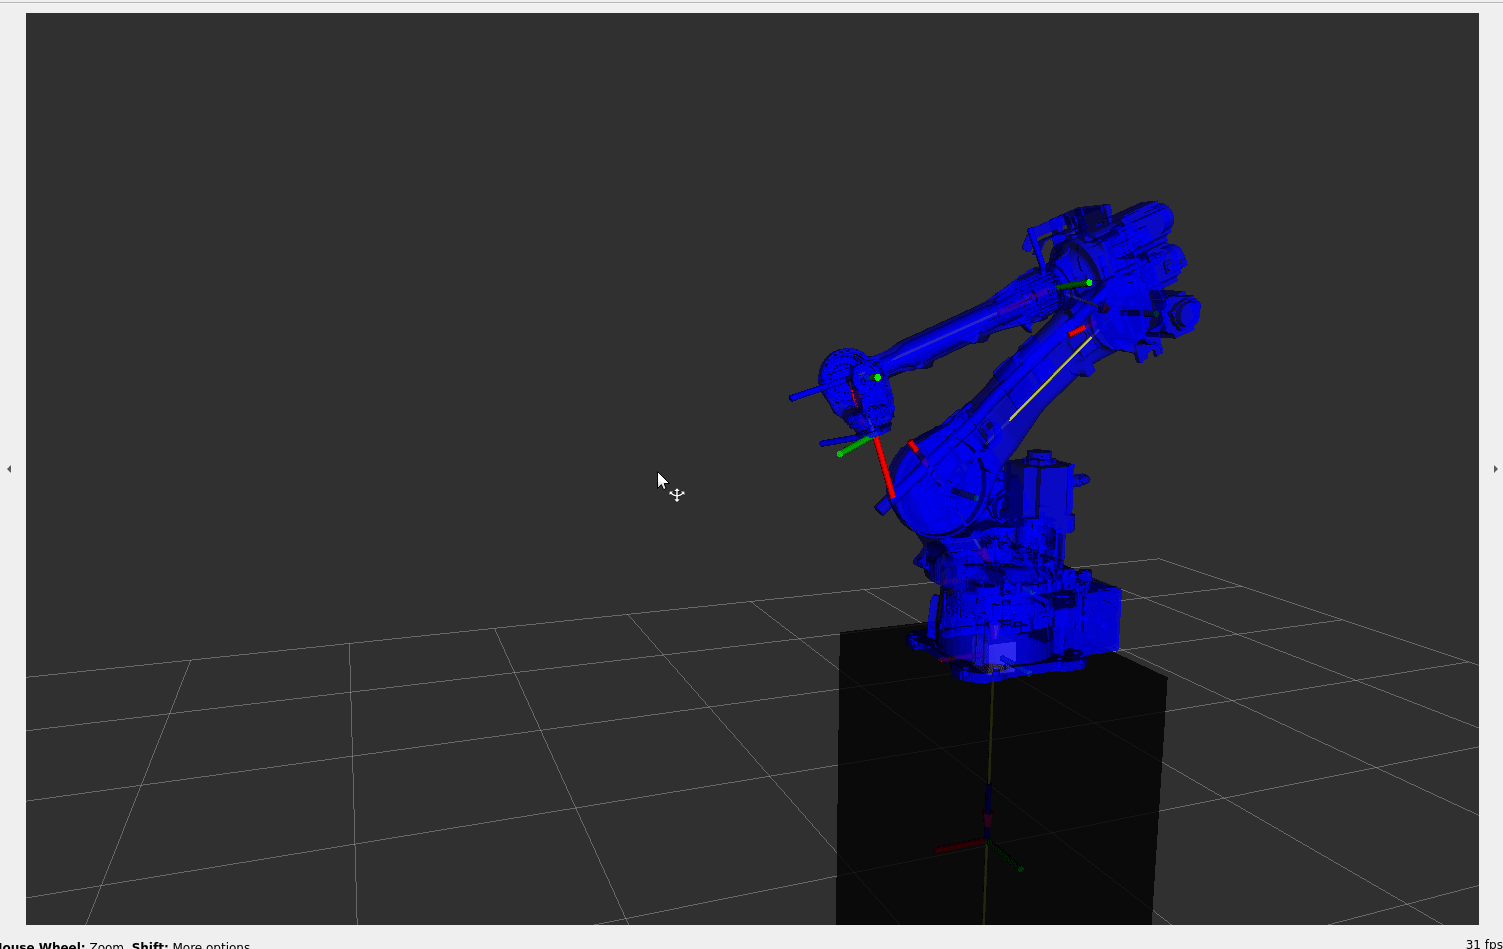
最终得到如下机械臂模型,如下图所示:
这里再贴一个yaskawa gp50的模型动图吧,调了好一会才行。
总结
以上就是博主构建一个机械臂urdf 并如何验证是否符合设计方案的仿真流程。
moveit 2 offcial ---- setup_assistant_tutorial ↩︎
moveit 2 offcial wiki ---- URDF Overview ↩︎
moveit 2 offcial wiki ---- SRDF Overview ↩︎